Introduction
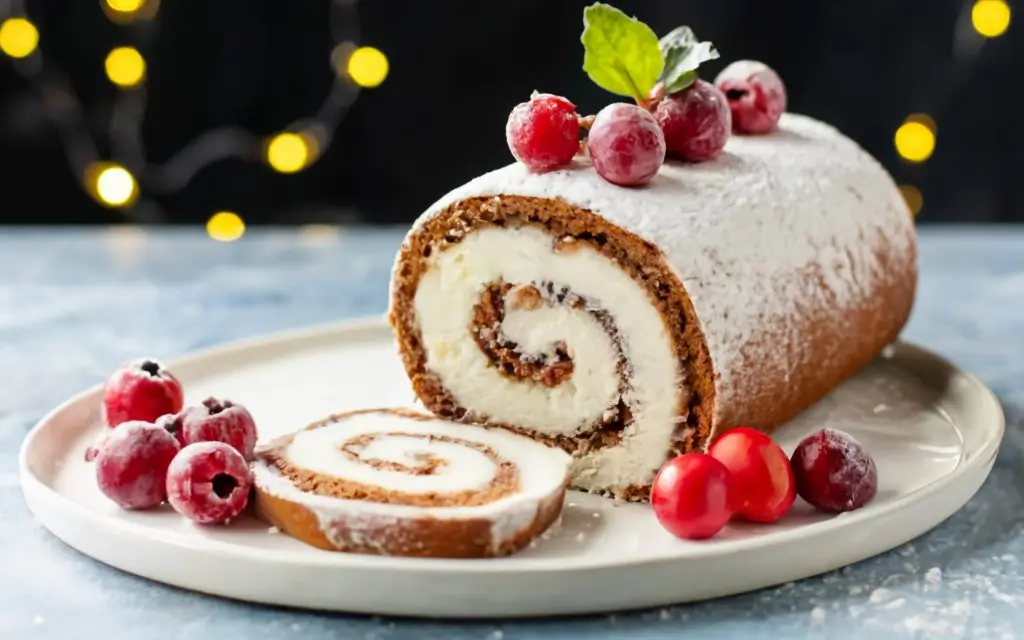
There’s something magical about holiday baking, isn’t there? The aroma of sweet treats in the oven, the vibrant colors of festive decorations, and the joy of sharing something homemade with loved ones—it’s pure holiday bliss. This Christmas Roll Cake is the ultimate showstopper for your celebrations. With its fluffy sponge cake, creamy filling, and a sprinkle of seasonal cheer, it’s as delightful to look at as it is to eat. Whether you’re hosting a holiday gathering or looking for a fun baking project, this recipe is as versatile as it is delicious. Let’s create some sweet holiday memories together!
Key Benefits of the Christmas Roll Cake
Why should you try this Christmas Roll Cake recipe? Let me tell you—it’s more than just a dessert. It’s a holiday experience wrapped in sweet, festive flavors. Here’s why this recipe deserves a spot in your holiday baking lineup:
- Effortless Elegance: Despite its impressive appearance, this cake is surprisingly simple to prepare. It’s perfect for beginners and seasoned bakers alike.
- Crowd-Pleaser: Whether you’re serving family, friends, or coworkers, this dessert always gets rave reviews. It’s light, creamy, and impossible to resist.
- Festive Appeal: With its swirl of red, green, and white, this roll cake adds a cheerful touch to your holiday table. It’s as decorative as it is delicious.
- Customizable Flavors: From classic vanilla and chocolate to peppermint or hazelnut, you can tailor this cake to suit your taste or experiment with something new.
- Make-Ahead Convenience: Busy holiday schedule? No problem! This cake can be prepped in advance, so you’ll have one less thing to worry about on the big day.
This recipe isn’t just about baking; it’s about creating moments of joy and connection. Let’s get started and make your holiday season even sweeter!
Christmas Roll Cake Ingredients

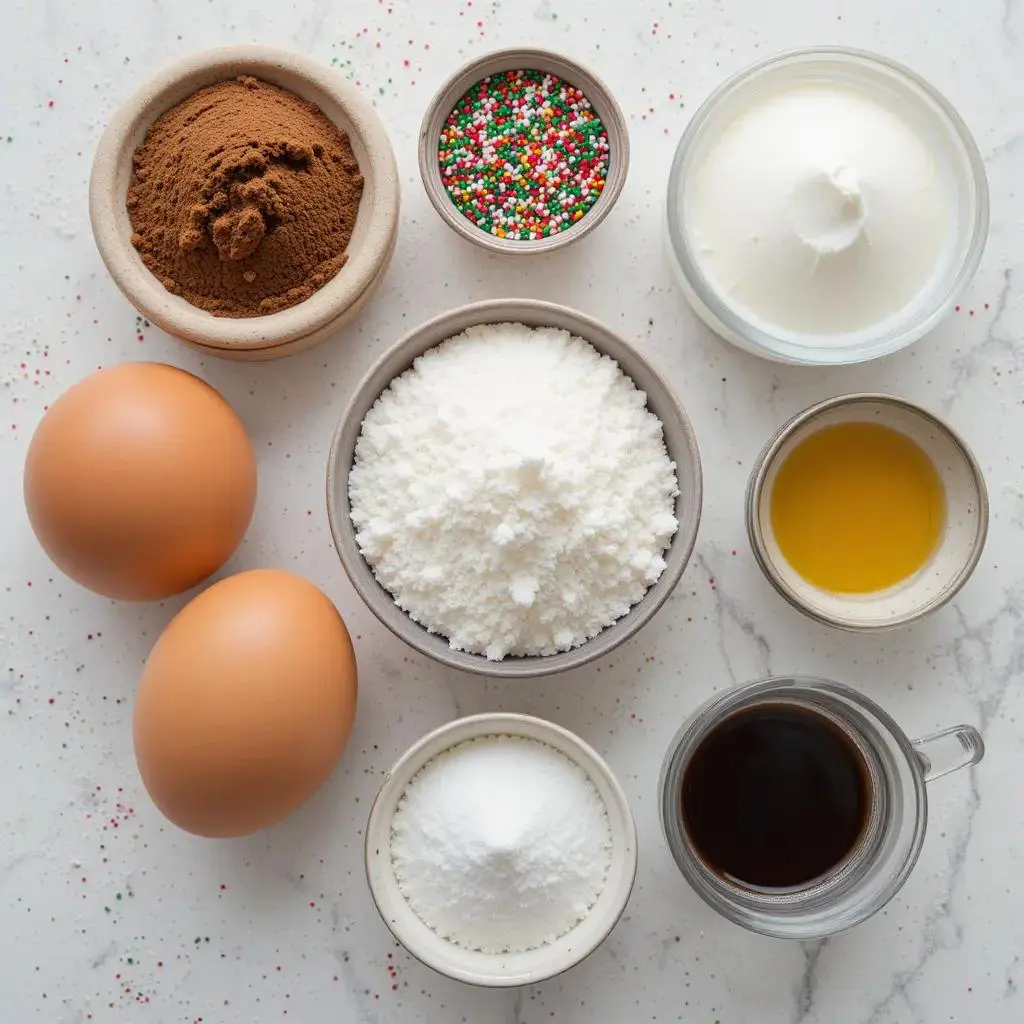
The secret to a perfect Christmas Roll Cake lies in choosing fresh, high-quality ingredients. Here’s everything you’ll need to create this festive dessert:
For the Cake:
- Eggs (4 large): At room temperature for better volume when whipped.
- Granulated Sugar (¾ cup): Adds just the right amount of sweetness.
- All-Purpose Flour (¾ cup): Be sure to sift it for a light, airy sponge.
- Cocoa Powder (2 tbsp): For a subtle chocolate flavor and rich color.
- Baking Powder (1 tsp): Helps the sponge rise beautifully.
- Salt (¼ tsp): Balances the sweetness and enhances the overall flavor.
- Vanilla Extract (1 tsp): A touch of warmth and depth.
For the Filling:
- Heavy Whipping Cream (1 cup): Whipped to soft peaks for a light, creamy texture.
- Powdered Sugar (2 tbsp): Sweetens the cream without weighing it down.
- Vanilla Extract (½ tsp): Adds a hint of flavor to the filling.
For Decoration:
- Red and Green Sprinkles: For a festive finishing touch.
- Powdered Sugar: Lightly dusted for a snowy effect.
- Edible Decorations: Optional but perfect for adding holiday cheer (think sugar holly leaves or edible glitter).
Pro Tip:
Let the eggs sit at room temperature before you begin. This simple step makes it easier to whip the eggs to the right consistency, ensuring a fluffy, flexible cake that rolls without cracking.
Now that we’ve got our ingredients ready, let’s dive into the fun part—putting it all together!
How to Make Christmas Roll Cake
Making a Christmas Roll Cake is easier than you think! Follow these step-by-step instructions to create a stunning holiday dessert that will wow your guests.
Step 1: Prepare the Cake Batter
- Preheat the Oven: Set your oven to 350°F (175°C) and line a 10×15-inch jelly roll pan with parchment paper. Lightly grease the paper to prevent sticking.
- Whip the Eggs and Sugar: In a large bowl, beat the eggs and granulated sugar with an electric mixer until thick, pale, and fluffy (about 5-7 minutes). This is key for a light sponge!
- Add Dry Ingredients: Sift together the flour, cocoa powder, baking powder, and salt. Gently fold the dry ingredients into the egg mixture in three additions to maintain the airiness.
- Incorporate Vanilla: Add the vanilla extract and fold gently until fully combined.
Step 2: Bake the Cake
- Spread the Batter: Pour the batter evenly into the prepared pan, smoothing the top with a spatula.
- Bake: Bake for 10-12 minutes, or until the cake springs back when lightly touched. Avoid overbaking, as this can cause cracking when rolling.
Step 3: Roll the Cake
- Prepare a Rolling Surface: Dust a clean kitchen towel with powdered sugar to prevent sticking.
- Flip the Cake: Carefully turn the warm cake out onto the prepared towel. Peel off the parchment paper.
- Roll While Warm: Starting at a short end, roll the cake and towel together into a spiral. Let it cool completely in this rolled shape—it helps the cake “remember” its form!
Step 4: Make the Filling
- Whip the Cream: In a chilled bowl, beat the heavy cream, powdered sugar, and vanilla extract until soft peaks form. Be careful not to overwhip!
Step 5: Assemble the Cake
- Unroll the Cake: Gently unroll the cooled sponge, being careful not to force it flat.
- Spread the Filling: Evenly spread the whipped cream over the cake, leaving a small border around the edges.
- Re-Roll the Cake: Roll the cake back up (without the towel this time) and place it seam-side down on a serving platter.
Step 6: Decorate
- Dust the top with powdered sugar for a snowy effect.
- Add sprinkles or edible decorations for a festive flair.
Pro Tip:
If the cake cracks slightly during rolling, don’t worry—it happens to the best of us! Use extra whipped cream or decorations to hide imperfections. Your guests will be too busy enjoying the flavor to notice!
You’ve just made a stunning Christmas Roll Cake. Let’s move on to tips and variations to customize your masterpiece!
Pro Tips and Variations for The Cake
To make your Christmas Roll Cake truly spectacular, here are some expert tips and fun variations to try. Whether you’re looking to avoid common pitfalls or experiment with flavors, these suggestions will elevate your baking game.
Pro Tips for Success
Prevent Cracking:Whip the cream. Roll the cake while it’s warm.
This helps set the shape and reduces the chance of splitting.
Use a Gentle Touch: When folding the dry ingredients into the batter, be careful not to overmix. Overmixing can deflate the air and result in a dense cake.
Keep It Cool: Ensure the cake is fully cooled before adding the whipped cream filling. A warm cake can cause the filling to melt and lose its texture.
Sharp Slices: For clean, professional-looking slices, use a sharp knife and wipe it clean between cuts.
Creative Variations
Peppermint Wonderland:Add a teaspoon of peppermint extract to the filling for a festive twist.
Sprinkle crushed candy canes on top for an extra pop of color and flavor.
Chocolate Hazelnut Bliss: wap the whipped cream filling for a layer of chocolate hazelnut spread.
Top with crushed hazelnuts for a nutty crunch.
Fruity Delight:Mix fresh chopped strawberries or raspberries into the whipped cream filling.Dust the top with freeze-dried fruit powder for a vibrant finish.
Gluten-Free Option:Use a gluten-free baking blend instead of all-purpose flour.Add a pinch of xanthan gum for extra elasticity to prevent cracking.Dairy-Free Alternative:
Use coconut cream in place of heavy whipping cream for the filling.
Substitute plant-based butter or margarine for greasing the pan.
Pro Tip:
Feel free to customize the decorations based on your holiday theme. From edible glitter to sugar snowflakes, a little creativity can make your roll cake the star of the dessert table.
With these tips and variations, you can create a Christmas Roll Cake that’s as unique and special as your holiday celebration. Let’s move on to serving suggestions to make your dessert presentation unforgettable!
Serving Suggestions for Cake
Once your Christmas Roll Cake is ready, it’s time to present it in all its festive glory! Here are some creative and practical ways to serve and enjoy this delightful dessert during the holiday season.
Plating Ideas
- Classic Elegance: Place the roll cake on a white or red serving platter to make the festive colors pop. Garnish the edges with fresh mint leaves and cranberries for a natural holiday touch.
- Festive Centerpiece: Add edible decorations like sugar holly leaves, gold dust, or a drizzle of melted chocolate for a showstopping presentation.
Perfect Pairings
- Hot Beverages: Serve with warm drinks like hot cocoa, spiced apple cider, or a creamy eggnog latte for a cozy dessert pairing.
- Bubbly Joy: If you’re hosting a party, pair the roll cake with a sparkling wine or champagne for a touch of elegance.
Holiday-Themed Presentation
- Mini Roll Slices: For large gatherings, slice the roll into smaller pieces and arrange them on a tiered dessert tray. It’s perfect for guests to grab and go.
- Snowy Effect: Dust each slice with powdered sugar just before serving for a fresh “snow-covered” look.
- Individual Servings: For an extra special touch, plate individual slices with a dollop of whipped cream and a sprinkle of festive sprinkles or edible glitter.
Pro Tip:
Serve the roll cake slightly chilled for the best texture and flavor. The cream filling will be firm yet fluffy, and the sponge will stay perfectly soft.
No matter how you present it, this Christmas Roll Cake is sure to be a highlight of your holiday table. Let’s wrap up with a few closing thoughts and address some frequently asked questions!
Conclusion
Congratulations! You’ve just made a stunning Christmas Roll Cake that’s sure to bring smiles to every holiday gathering. This festive dessert is not only a treat for the taste buds but also a visual delight, adding a charming touch to your celebration. Whether you’re sharing it with loved ones or enjoying it on your own, this cake captures the essence of the holiday season—sweet, joyful, and filled with warmth.
Final Thoughts
Baking this roll cake doesn’t just create a delicious dessert; it helps create lasting memories. Plus, with all the customizable options and variations, you can make it your own each year. So, gather your ingredients, get your oven preheating, and let the holiday baking begin!
We’d love to hear how your Christmas Roll Cake turns out—share your creations with us on social media or drop a comment below. Happy baking and happy holidays!
The best part about this roll cake? It’s so easy to make ahead. You can prepare it a day or two days in advance and store it in the fridge. This gives the flavors time to meld and makes it one less thing to worry about on the big day!
Enjoy the sweetness of the season with this easy, delicious, and visually stunning treat!
FAQs

Christmas Roll Cake
Ingredients
- For the Cake:
- Eggs 4 large: At room temperature for better volume when whipped.
- Granulated Sugar ¾ cup: Adds just the right amount of sweetness.
- All-Purpose Flour ¾ cup: Be sure to sift it for a light, airy sponge.
- Cocoa Powder 2 tbsp: For a subtle chocolate flavor and rich color.
- Baking Powder 1 tsp: Helps the sponge rise beautifully.
- Salt ¼ tsp: Balances the sweetness and enhances the overall flavor.
- Vanilla Extract 1 tsp: A touch of warmth and depth.
- For the Filling:
- Heavy Whipping Cream 1 cup: Whipped to soft peaks for a light, creamy texture.
- Powdered Sugar 2 tbsp: Sweetens the cream without weighing it down.
- Vanilla Extract ½ tsp: Adds a hint of flavor to the filling.
- For Decoration:
- Red and Green Sprinkles: For a festive finishing touch.
- Powdered Sugar: Lightly dusted for a snowy effect.
- Edible Decorations: Optional but perfect for adding holiday cheer think sugar holly leaves or edible glitter.
Instructions
- Step 1: Prepare the Cake Batter
- Preheat the Oven: Set your oven to 350°F (175°C) and line a 10×15-inch jelly roll pan with parchment paper. Lightly grease the paper to prevent sticking.
- Whip the Eggs and Sugar: In a large bowl, beat the eggs and granulated sugar with an electric mixer until thick, pale, and fluffy (about 5-7 minutes). This is key for a light sponge!
- Add Dry Ingredients: Sift together the flour, cocoa powder, baking powder, and salt. Gently fold the dry ingredients into the egg mixture in three additions to maintain the airiness.
- Incorporate Vanilla: Add the vanilla extract and fold gently until fully combined.
- Step 2: Bake the Cake
- Spread the Batter: Pour the batter evenly into the prepared pan, smoothing the top with a spatula.
- Bake: Bake for 10-12 minutes, or until the cake springs back when lightly touched. Avoid overbaking, as this can cause cracking when rolling.
- Step 3: Roll the Cake
- Prepare a Rolling Surface: Dust a clean kitchen towel with powdered sugar to prevent sticking.
- Flip the Cake: Carefully turn the warm cake out onto the prepared towel. Peel off the parchment paper.
- Roll While Warm: Starting at a short end, roll the cake and towel together into a spiral. Let it cool completely in this rolled shape—it helps the cake “remember” its form!
- Step 4: Make the Filling
- Whip the Cream: In a chilled bowl, beat the heavy cream, powdered sugar, and vanilla extract until soft peaks form. Be careful not to overwhip!
- Step 5: Assemble the Cake
- Unroll the Cake: Gently unroll the cooled sponge, being careful not to force it flat.
- Spread the Filling: Evenly spread the whipped cream over the cake, leaving a small border around the edges.
- Re-Roll the Cake: Roll the cake back up (without the towel this time) and place it seam-side down on a serving platter.
- Step 6: Decorate
- Dust the top with powdered sugar for a snowy effect.
- Add sprinkles or edible decorations for a festive flair.
Got questions? Don’t worry, we’ve got you covered! Here are some frequently asked questions to help guide you through the process and ensure your Christmas Roll Cake turns out perfect every time.
1. Can I make the cake ahead of time?
Absolutely! In fact, making the cake a day or two in advance can help the flavors come together beautifully. Simply bake, roll, and store the cooled cake in plastic wrap at room temperature. When you’re ready to assemble, unroll it, add the filling, and re-roll it for a fresh, fluffy result.
2. How do I prevent the cake from cracking?
To prevent cracking, always roll the cake while it’s still warm. This softens the cake and helps it retain its shape. Also, don’t overbake—it should be light and springy to the touch, not firm or dry. If cracks do happen, just cover them with extra whipped cream or decorative toppings!
3. Can I use a different filling?
Definitely! The filling is one of the best parts of this recipe because it’s so versatile. Try swapping the whipped cream for a cream cheese frosting, chocolate ganache, or even a fruit compote for a fresh twist. Just make sure to adjust the consistency so it’s spreadable but not too runny.
4. How do I store leftover roll cake?
To store any leftovers, wrap the roll cake in plastic wrap and keep it in the fridge for up to 3 days. If you’ve used fresh fruit or a more delicate filling, it’s best to eat it within 1-2 days for optimal freshness.
5. Can I freeze the Christmas Roll Cake?
Yes, you can freeze the unfilled cake! After baking, let the cake cool completely, then roll it in plastic wrap and store it in an airtight container or freezer bag. When you’re ready to serve, just thaw it at room temperature, add your filling, and decorate. It’s an easy make-ahead option for the busy holiday season!

